Pragmatic view of the modern front-end application development
I wrote several posts about the way I build back-end applications using Scala and today it’s time to show you what modern front-end application may look like from a pragmatic point of view. Why do I call this pragmatic? Because I consider myself as a full-stack engineer so I prefer more mature approaches rather than the bleeding edge.
Disclaimer
This article is intended to be read by full-stack engineers or inexperienced front-end developers. Front-end experts may find this article outdated.Note
The project described in this article is available on my GitHub profile.I had been using multiple approaches since I started writing web applications until I came up with the current one. The evolution of techniques I was following was like this:
Pure JS -> JQuery -> Vaadin -> AngularJS -> (current approach)
All of these approaches were big steps in relation to previous ones, but they still had a lot of downsides. The main disadvantage of most of them is a high support cost (this doesn’t apply to Vaadin, but it has its own kinds of problems).
What a modern web application is
The JavaScript world is the most dynamic and fast growing environment and therefore what I’m saying today will be quite outdated tomorrow and absolutely useless in a week. But there are some stable trends which will be relevant for a longer period of time.
Per my understanding, a modern web app today should:
- Be a Single Page Application.
- Use dependencies (no manual copying of js files to the
/jsfolder, the same is applicable to css). - Have automatic packaging. A resulted js should only have code that is used (not entire
node_modulewith all dependencies). - Allow you to write in latest JS versions (>=ES6) or TypeScript and produce ES5/ES6 compatible code.
- Provide you with browser auto-reload in the dev mode.
- Conduct type checking.
- Allow writing unit tests.
In this article, I’m going to show you how you can achieve all these goals on the example of a real application.
Project structure
Dependency management
The time when it’s ok to copy js files into /js folder has come and gone. Now all libraries you may want to use are stored on npmjs.com. To start working with it, you need to install node and npm or yarn (yarn is an npm alternative that claims that it provides faster and more reliable user experience while preserving npm file/command format).
It used to be popular to use Bower as a client-side application dependency manager, but it now seems Bower is dying so npm/yarn is more preferable way.
The entry point to an npm project is package.json:
{
  "name": "typescript-react-template",
  "version": "1.0.0",
  "description": "",
  "main": "",
  "scripts": {
    "build": ...,
    "dev": ...,
    "lint": ...,
    "test": "jest"
  },
  "dependencies": {
    ...
  },
  "jest": {
    ...
  },
  "devDependencies": {
    ...
  }
}
The dependencies section defines what libraries will be available in the application scope. An actual dependency looks like this "react": "15.4.2".
Note
By default, the '--save' npm flag saves all versions in the caret range syntax. This is a bad practice in the Java world although this is a common practice in the JS world. This may cause random build failures and that’s why I prefer the fixed version notation.The devDependencies section covers all dependencies used during build/test/etc.
After you have package.json configured, you can execute npm install. This will download all dependencies from npmjs.com and put into the node_modules folder.
TypeScript
Since I wanted to have a more supportable and predictable codebase, I found TypeScript very helpful. TypeScript is a typed superset of JavaScript. It means that you write JavaSript as you did before but you have the ability to optionally specify types in your code, as well as to have all external libraries to be typed. Moreover, since the code is typed, IDEs can do smarter autocompletion and help with refactoring. All type errors will be shown during the transpilation process.

To make it work you need to have the TypeScript compiler in your devDependencies and compiler configuration as follows:
{
  "version": "0.0.0",
  "compilerOptions": {
    "module": "commonjs",
    "target": "es5",
    "jsx": "react",
    "sourceMap": true,
    "emitDecoratorMetadata": true,
    "experimentalDecorators": true,
    "noUnusedLocals": true,
    "noUnusedParameters": true,
    "outDir": "dist"
  },
  "typeRoots": ["node_modules/@types"],
  "exclude": [
    "dist",
    "node_modules",
    "build"
  ]
}
This is a typical configuration that transpiles TypeScript to JavaScript (ES5 standard which is supportable by most popular browsers).
In order to use external dependencies in a typed way, you need to find and put a typing file (*.d.ts) inside your project for each dependency that is used from your code. Some libraries have built-in typings, but for those that don’t, there is a repository with community driven typings for hundreds of libraries. All these typings are available in the NPM with a prefix @types/ e.g. typings for react are @types/react so you can install it as follows: npm install --save react @types/react.
If everything is configured correctly, you can compile your project from the command line by using tsc.
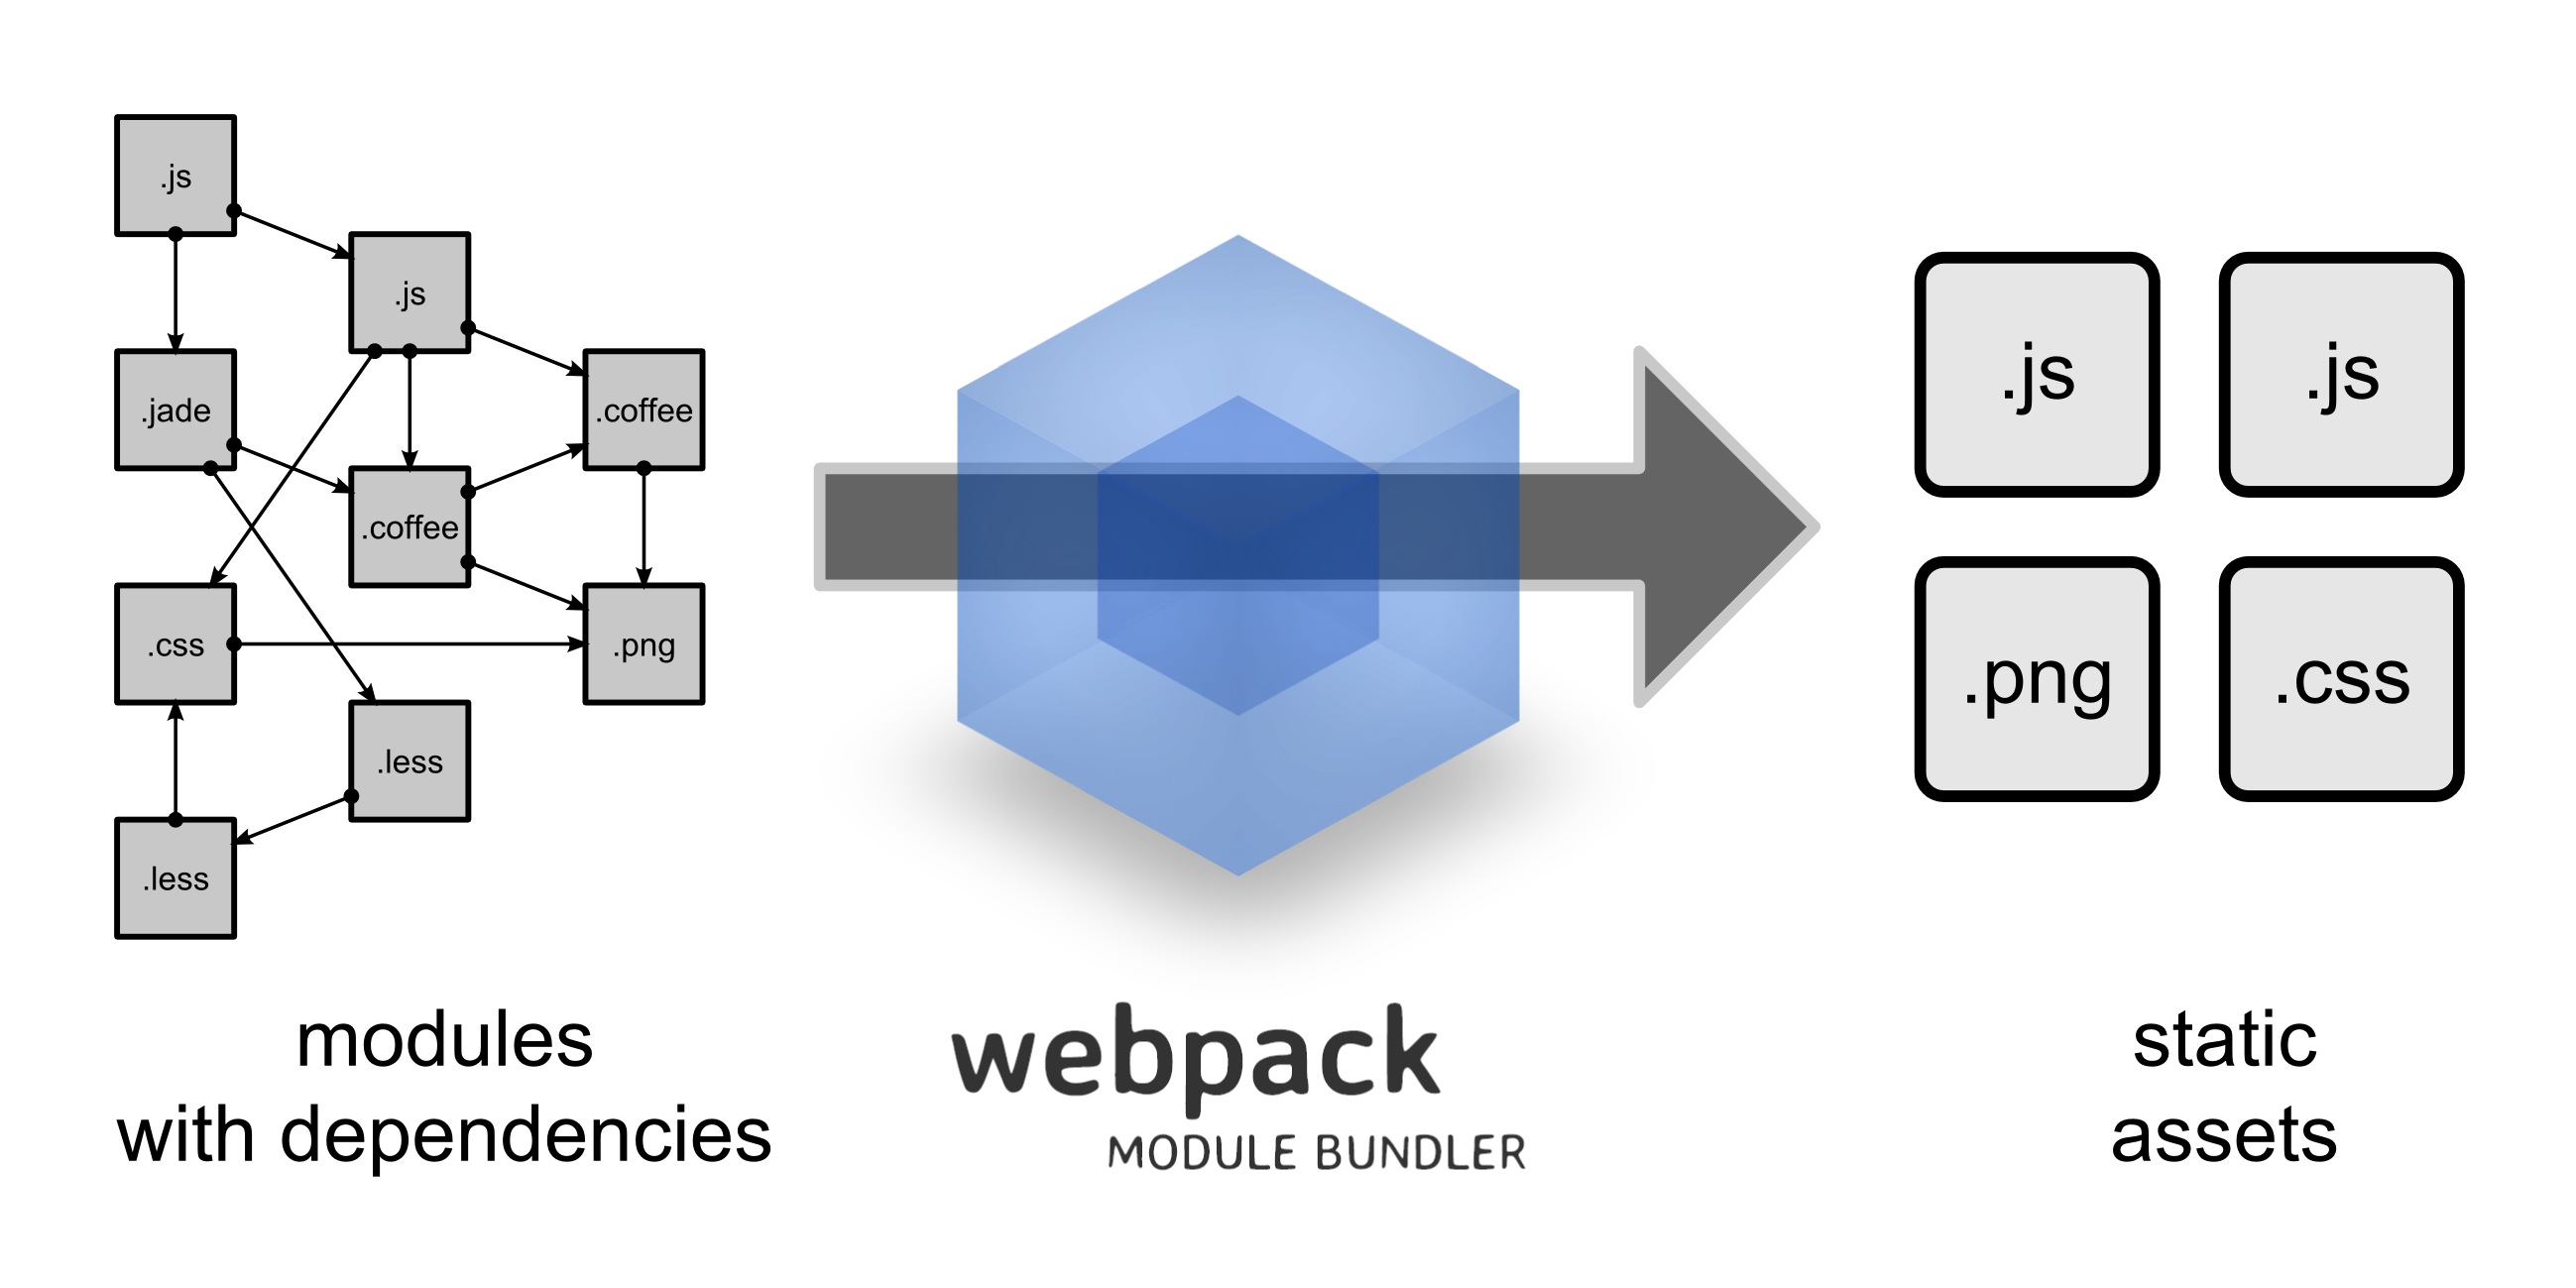
Webpack
Now we have all dependencies and our code base and we need to do ‘something’ in order to produce resulting js and css files. There used to be a couple of standard approaches to do that ‘something’ - Grunt and Gulp. Both of them knew where your sources and dependencies are and then were able to concatenate all of it and put to a dist folder.
Then wepback came to the scene. The main idea of it is to have a declarative configuration that knows only where your sources are and is able to understand what dependencies (not only JavaScript) are used in the code. Knowing all of that, webpack can produce more compact resulting bundles with fewer efforts. As a bonus, it has a built-in auto-reload server.
When I say declarative, I mean something like this:
{
    context: __dirname + "/app",
    entry: "./index.js",
    output: {
        path: __dirname + "/dist",
        filename: "bundle.js"
    }
}
And it’s all you need to write to glue all js files starting with ./index.js and going deeper to its dependencies.
Webpack works with loaders. Since we want to write code in TypeScript we need to setup the following loader npm install --save-dev ts-loader and add the following object to the webpack config.
...
              {
                test: /\.(ts|tsx)$/,
                exclude: /(node_modules|bower_components)/,
                loaders: ['react-hot-loader/webpack', 'ts-loader']
              }
...
This loader will be using the configuration we defined in the TypeScript section.
Usually, when you write web applications you would want to have two different scenarios - development and production. A development one should support hot code reload, produce unminified js with source maps and have some dev-specific flags, while a production scenario is intended to be used as a final bundle packager. To achieve this goal, you can create multiple configs with a shared common part. Since Webpack is run on node.js you can treat its configs as regular javascript code so that you create a common part as an exported js object and then merge it with production and development ones using the plugin webpack-merge.
Linting
When you collaborate with other people, you want to keep your code style consistent. Also, it’s good to have some automated tool that can check common anti-patterns and errors. All these checks are provided by tslint. It can be installed from NPM as follows npm install --save-dev tslint.
There are a bunch of built-in rules that you can work with out of the box. To start using it, you just need a config file that may look like this:
{
  "rules": {
    "class-name": true,
    "comment-format": [true, "check-space"],
    "indent": [true, "spaces"],
    "no-duplicate-variable": true,
    "no-eval": true,
    ...
    "jsx-self-close": true
  },
  "rulesDirectory": [
    "node_modules/tslint-react/rules"
  ]
}
Now you can run tslint checks within your codebase tslint "src/**/*.ts*" (to make tslint executable you need to install it globally). This already is quite good but we’ll configure it to not execute this command manually. This can be done by webpack’s loader. In order to do it, you need to install tslint-loader as a dev dependency and configure it in the webpack configuration:
{
    preLoaders: [
            {
                test: /\.ts[x]*$/,
                loader: "tslint"
            }
        ],
  ...
}
Now, each compile process will be prepended by tslint check and you’ll see all errors and warnings as soon as you save the source file.

Build steps
The package.json is quite limited in imperative task declaration - you can’t specify complex logic of your build steps. The only you can do is define commands that should be executed. It’s not powerfull but at least you don’t need to remember all application lifecycle commands.
Usually, I have these four scripts:
"scripts": {
  "build": "NODE_ENV=production webpack -p --config webpack.production.config.js --progress --profile --colors",
  "dev": "webpack-dev-server --progress --profile --colors --hot",
  "lint": "tslint \"src/**/*.ts*\"",
  "test": "jest"
}- build produces production-ready bundles that you can distribute as is.
- dev starts dev server.
- lint checks the codebase using linters.
- test launches unit tests.
To start any of the scripts, you can run npm with the following arguments npm run [script name]
Project’s stack
One year ago I wrote a post about om (clojurescrit library based on react.js). Now it’s time to bring React.js to a real life project in the enterprise-ish world.
React.js
I think there’s no need to describe what React.js is. This framework if pretty popular right now and has a lot of hype around it. TypeScript fully supports JSX so you can write React components and benefit from type checking. A typical component may look like this:
interface Props {
    userId: string;
}

export class UserView extends React.Component<Props, any> {
    ...
}
Now if you try to use it with an incorrect type (e.g. <UserView userId={1} />) you would get a type check error.
Communication with a backend API
I liked the idea of using rx.js instead of promises. An HTTP client on top of rx.js was introduced by angular 2 and I found it very useful. It looks like you work with promises when you have simple scenarios and brings all the power when you need to deal with dependent requests, delayed execution, execution timeouts, etc.
I use a library called ts-rx-rest which I contribute to. Basically, it’s a typed HTTP client with an rx.js interface and it does’t make you follow any particular approach – you can use it in any typescript project. Usually I put all HTTP related code to separate stateless *Service classes so it can be mocked in unit tests.
export class UserService {
  getUsers(): Observable<Array<User>> {
    return Rest.doGet<Array<User>>(Config.API_URL + '/users');
  }
  ...
}
Now let’s assume you need to load a user profile with permission list for his group. If you’re waiting too long for any of these two requests then we want just to show an error.
const user$ = userService.getUser(userId);
const userPermissions$ = user$.flatMap(user => permissionsService.getPermissions(user.groupId));

Observable.zip(user$, userPermissions$)
  .timeout(200)
  .subscribe(
      ([user, userPermissions]) => {
        // process 'user' and 'userPermissions'
      },
      e => {
        // process errors
      }
  )
This looks very clear, doesn’t it?
MobX
When I just started using React.js I was trying to use pure components and manage their state manually via setState but this approach is not scalable. Then I found redux, redux looks very promising? but there’s one big problem - it’s way too verbose. In the meanwhile, my co-worker had found MobX and it had become a relief.
Now I split all TypeScript code into three types of components:
- React component - JSX component with no state management
- Store - component’s state
- Service - stateless HTTP API layer
React components are only responsible for rendering – they know nothing about the state. All state management is located in stores as well as event reactions (e.g. button clicks, input value changes, etc).
MobX introduces two main roles of components: observer and observable. An observer is an object whose state changes should be tracked by observers. In our case, a react.js component is an observer that is re-rendered once a state of the observables (only those that are used in the render() method) has been updated. It may look like this:
export class UserViewStore {
    @observable users: User[] = [];

    //...
}

...

@observer
export class UsersView extends React.Component<Props,any> {

  //...

  render() {
    return <div>{store.users.map(u => <p>{u.name}</p>)}</div>;
  }
}
When you change users by adding/removing a value to/from the array or assign a new array to the variable, UsersView will be re-rendered automatically.
Note
If you need to update multiple variables consequently or do multiple changes to an array, you need to think of atomicity of the re-rendering because each update will cause virtual DOM recalculation. In these cases, you need to use the runInAction wrapper function.Dependency Injection
MobX provides you with build-in Dependency Injection functionality but it only works with react.js components. When you have multiple stores which depend on each other, you would like to have an ability to inject stores to other stores as well as to inject stores to react.js components. I haven’t found any libraries that solve this problem so that I wrote my own solution:
export const diContext: any = {};

export function diInject(): any {
    return function (target: any, propertyKey: string) {
        Object.defineProperty(target, propertyKey, {
            get() {
                const bean = diContext[propertyKey];
                if (bean) {
                    return bean;
                } else {
                    throw new Error(`Context has no bean with name ${propertyKey}.
                    Available beans: ${Object.getOwnPropertyNames(diContext).join(', ')}`);
                }
            },
            set() {
                throw new Error('Not allowed');
            },
            enumerable: true,
            configurable: true
        });
    };
};
This injection decorator uses globally defined diContext and is able to dynamically inject objects from diContext by name.
diContext.userService = new UserService();
...
export class UserViewStore {
    @diInject() userService: UserService;
    ...
}
Testing
You can’t deliver reliable software without testing nowadays. It used to be extremely difficult to test javascript but now you can run unit tests in node.js or in a browser very easy. I prefer using jest. The main advantage is that jest is a Zero configuration testing platform – it just works, moreover it works with TypeScript.
To start, we need to install jest npm install --save-dev jest-cli @types/jest, then add this small config object to package.json
"jest": {
    "moduleFileExtensions": [
      "ts",
      "tsx",
      "js"
    ],
    "testRegex": "/__tests__/.*\\.(ts|tsx|js)$"
  }
Now ready to go!
Beside jest, I am going to use typemoq, a mocking library for typescript: npm install --save-dev typemoq. Let’s look at some tests. Per our configuration, tests should reside in ./__tests__/. Here is an example of a test that works with a store.
it('UserViewStore should be filled with data', () => {
    const user: User = {
        id: 1,
        firstName: "test",
        lastName: "test"
    };

    const userServiceMock = TypeMoq.Mock.ofType(UserService);
    userServiceMock.setup(x => x.getUsers()).returns(() => Observable.just([user]));

    diContext.userService = userServiceMock.object;
    const store = new UserViewStore();

    expect(store.users.length).toEqual(1);
    expect(store.users[0].firstName).toEqual("test");
});
As you can see, we prepared a service layer so that it doesn’t make a request to the real backend. Instead, it works with Observable.just that just executes its body right away. After that, we validate the state of the store with a built-in chain expect(...).toEqual(...).
That looks great, doesn’t it? Want more? Due to a functional nature of react, we can easily test JSX output. Since we don’t use react component’s state, we just need to explicitly define stores’ state. Then we can calculate the virtual DOM and compare it with a snapshot. The snapshot creation and comparison is a built-in feature of jest.
it('UsersView should render proper DOM', () => {
    const user1: User = {
        id: 1,
        firstName: "test",
        lastName: "test"
    };
    const user2: User = {
        id: 2,
        firstName: "test2",
        lastName: "test2"
    };

    const userStoreMock = TypeMoq.Mock.ofType<UserStore>();
    const userViewStoreMock = TypeMoq.Mock.ofType<UserViewStore>();
    userStoreMock.setup(x => x.createUserViewStore()).returns(() => userViewStoreMock.object);
    userViewStoreMock.setup(x => x.users).returns(() => [user1, user2]);

    diContext.userStore = userStoreMock.object;

    expect(create(<Router><UsersView/></Router>).toJSON()).toMatchSnapshot();
});
The first run of the test (npm run test) will generate a snapshot, that will be treated as the correct value, further runs will just compare produced DOM with a snapshot.
Dev Tools
When you write real applications at work you would like to be productive as more as you can. Fortunately, there are multiple tools can help to achieve it.
Since we’re using webpack, there is a built-in browser page refresher. All you need to do it to run npm run dev. After each change, your page will be auto-refreshed.
The next tool that saves your life is Google Chrome Dev Tools and plugins. First of all, Dev Tools simplifies life by providing DOM navigator, network monitoring tools, debugger, profiler, etc. You can debug your TypeScript code without any additional extensions - it just works. If you need more advanced tools, you can take a look at React Developer Tools. It is a google chrome extension that can show a virtual DOM with all its attributes. Sometimes, it’s very helpful to check what is the current virtual DOM and how it relates to real DOM.

Another helpful extension is MobX Developer Tools. This extension is toolset that exposes MobX’s magic. It can show DOM re-rendering, actions and reactions, observable changes, etc.
Wrapping up
There is no one proper way to create applications in the JS world. The JS environment is extremely dynamic – every day you can find a new library that simplifies or improves some aspects of application development. I described my current approach and I have to doubt that in several months 50% of described techniques will be rethought and it will a new article in my blog.